
Up!
 Note
Note
|
| – | Move seat to foremost position using fore and aft adjustment mechanism. |
| Vehicles with height adjustment |
| – | Move seat to highest position using height adjustment lever. |
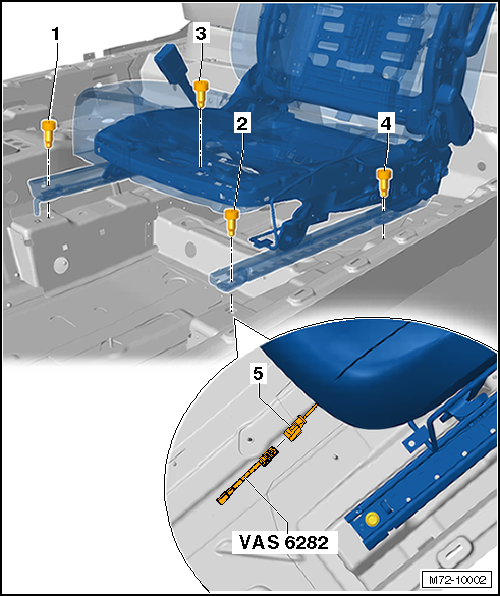
| – | Unscrew bolts -3- and -4- (40 Nm). |
| Vehicles without height adjustment |
| – | Unscrew bolts -3- and -4- using door alignment tool -3320- or bit XZN 10 -T10154- (40 Nm). |
| Continued for all vehicles |
| – | Move seat to rearmost position using fore and aft adjustment mechanism. |
| – | Disconnect vehicle battery → Electrical system; Rep. gr.27. |
 WARNING
|
| – | Depending on vehicle equipment, disconnect seat wiring harnesses from seat at coupling station. |
| – | Connect airbag adapter -VAS 6282- to wiring harness of side airbag -5- → Chapter. |
| – | Unscrew bolts -1- and -2- (40 Nm). |
 Caution
|
| – | Insert right hand between backrest and cushion. Grasp front end of seat cushion with your left hand and lift seat out of vehicle. |
|
| – | Lift seat into vehicle through front door opening. |
| – | Lift seat into respective openings in floor and onto locating pins on tunnel side. |
WARNING
|
| If seat cross member mounting plate threads have been damaged: |
| – | Replace seat cross member mounting plate concerned → Rep. gr.51. |
| – | Tighten bolt -1- (40 Nm). |
| – | Tighten bolt -2- (40 Nm). |
| – | Remove airbag adapter -VAS 6282-. |
| – | Lock side airbag wiring harness -5- into coupling station. |
| – | Depending on vehicle equipment, secure all other wiring harnesses in coupling station. |
WARNING
|
| – | Connect vehicle battery → Electrical system; Rep. gr.27. |
| – | Switch on ignition. |
| – | Move seat to foremost position using fore and aft adjustment mechanism. |
| – | Tighten bolt -3- (40 Nm). |
| – | Tighten bolt -4- (40 Nm). |