volkswagen Workshop Repair Guides

Volkswagen Workshop Service and Repair Manuals

Removing and installing final drive gear wheel > < Renewing oil seals for flanged shafts with gearbox installed
5-speed manual gearbox 085
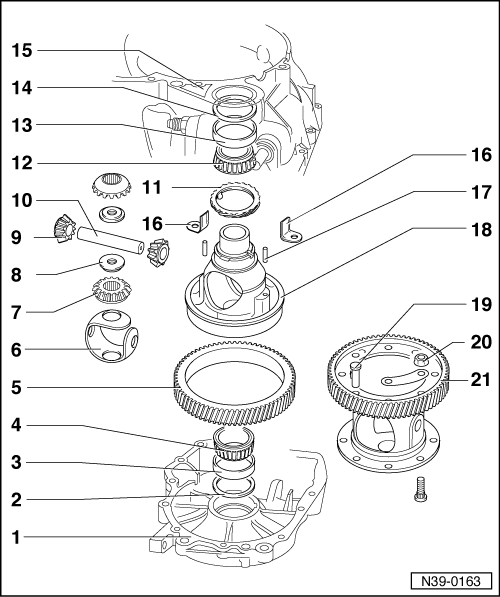
Dismantling and assembling differential
 
N39-0163

Notes:

  • ◆ Heat taper roller bearing inner race to
    100 °C before installing.
  • ◆ Always renew both taper roller bearings together as a set.
  • ◆ If taper roller bearings are renewed adjust differential .
  • Gearbox housing
  • Shim S1
    • ◆ For differential
    • ◆ Always 1 mm thick
  • Taper roller bearing outer race
    • ◆ Pressing out => Fig.1
    • ◆ Pressing in => Fig.2
  • Taper roller bearing inner race
    • ◆ Pulling off => Fig.3
    • ◆ Pressing on => Fig.4
 
N39-0163
  • Final drive gear wheel
    • ◆ Removing and installing
      => Page 39-17
    • ◆ Ensure correct ratio (number of teeth) => Page 00-3
  • One-piece thrust washer
    • ◆ Coat with gearbox oil when installing
  • Sun wheel
    • ◆ Installing => Fig.5
  • Threaded piece
  • Planet pinion
    • ◆ Installing => Fig.5
  • Planet pinion axis shaft
    • ◆ Knock out with drift
  • Speedometer drive wheel
    • ◆ Lever out with screwdriver
 
N39-0163
  • Taper roller bearing inner race
    • ◆ Pulling off => Fig.3
    • ◆ Pressing on with VW 454
  • Taper roller bearing outer race
    • ◆ Pressing out => Fig.7
    • ◆ Pressing in => Fig.8
  • Shim S2
    • ◆ For differential
    • ◆ Determining thickness => Page 39-23
  • Clutch housing
  • Angle piece
    • ◆ Secures planet pinion axis shaft on gearboxes where final drive gear wheel is rivetted
    • ◆ Secured by rivets (Item19 )
 
N39-0163
  • Spring pin
    • ◆ For securing planet pinion axis shaft on gearboxes with bonded gear wheel
  • Differential housing
    • ◆ When renewing: Observe adjustment overview => Page 39-22
  • Rivet
    • ◆ As produced
    • ◆ Drilling out => Fig.9
    • ◆ Installing gear wheel with bolts => Fig.10
  • Hexagon nut, 70 Nm
  • Final drive gear, rivetted or bolted
    • ◆ Rivetted in production
    • ◆ Bolted => Fig.10
 
V39-1804

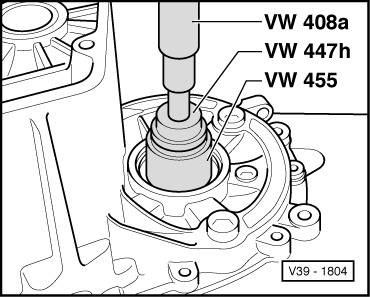
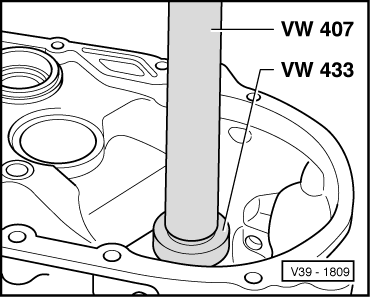
→ Fig.1     Pressing out taper roller bearing outer race

 
V39-1805

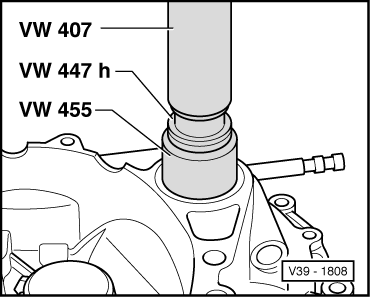
→ Fig.2     Pressing in taper roller bearing outer race

 
V39-1601

→ Fig.3     Pulling off taper roller bearing inner race

  • ‒ Before fitting the extractor position press piece 30-11 on differential housing.

Note:

Both both taper roller bearing inner races are pulled off the differential housing in the same way.

 
V39-1806

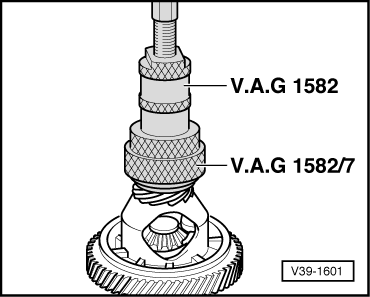
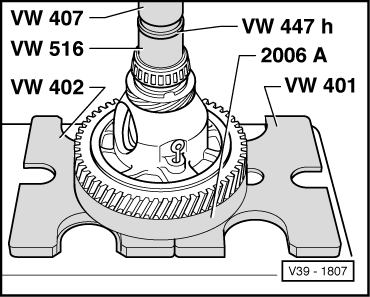
→ Fig.4     Pressing on taper roller bearing inner race

  • ‒ Heat inner ring before pressing on to approx. 100° C.
 
V39-1810

→ Fig.5     Installing differential bevel wheels

  • ‒ Lubricate one piece thrust washer with gearbox oil and install.
  • ‒ Install both sun wheels and secure (e.g. with flanged shaft).
  • ‒ Insert a planet pinion and turned through 180°.
  • ‒ Insert 2nd planet pinion exactly opposite first. Swing planet pinions into position. Push axis for planet pinions in up to 1st gear.
  • ‒ Insert threaded pieces ensuring they are seated correctly.
  • ‒ Drive planet pinion shaft into final position and secure.
 
V39-1807

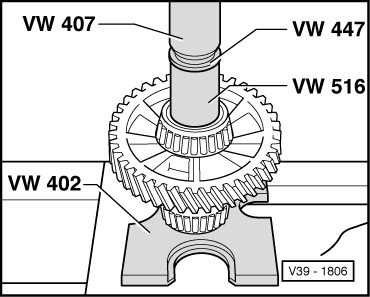
→ Fig.6     Pressing on taper roller bearing inner race

  • ‒ Heat inner ring before pressing on to approx. 100°C.
 
V39-1808

→ Fig.7     Pressing out taper roller bearing outer race

 
V39-1809

→ Fig.8     Pressing in taper roller bearing outer race

 
V39-1282

→ Fig.9     Drilling off rivet heads

  • ‒ Drill out rivet heads with 12 mm drill from countersunk side
    and knock-out with drift.

Note:

Clean differential before and after drilling, protect taper roller bearing from drillings.

 
V34-0606

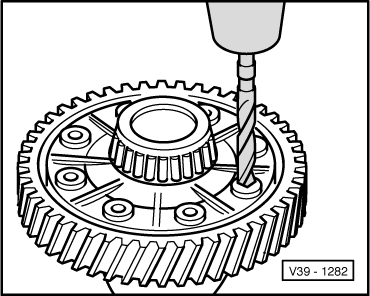
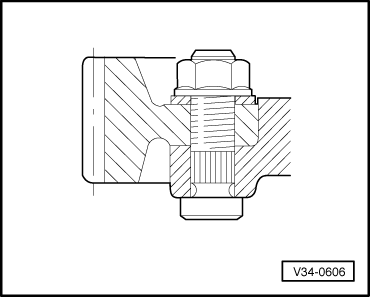
→ Fig.10     Assemble gear wheel and differential housing using special bolts, plates and nuts

Removing and installing final drive gear wheel > < Renewing oil seals for flanged shafts with gearbox installed